🕸️Web Component
Integrating your bot into your website enhances user engagement and provides seamless support directly on your platform. This process is straightforward and involves embedding a small snippet of code.
Web Component Parameters
Before Integrating the Web Component, you need to understand the following parameters:
ClientId, OrgId, and SecretKey: These can be obtained from the Blockbrain team.
UserUid: This unique string represents each user and can be dynamically set in the HTML. It could be any identifier, such as an email, username, phone number, or user ID.
Note: This field is optional. If left blank, the system will not store any user history. Each visit will be treated as a new session, with no saved data from previous visits.
WebComponent uID: The WebComponent UID is a unique identifier that can be individually set in the admin dashboard of your instance.
Web Component Creation
Follow these simple steps to create a Web Component in Blockbrain:
Access the Blockbrain Platform
Open your web browser and go to your Blockbrain tenant domain (e.g., run.theblockbrain.ai).
Login with Admin Credentials
Enter your Admin username and password to access the platform.
Navigate to the Admin Tab
Click on the Admin button in the top navigation bar.
Open the WebComponent Section
On the left sidebar, locate and click on WebComponent.
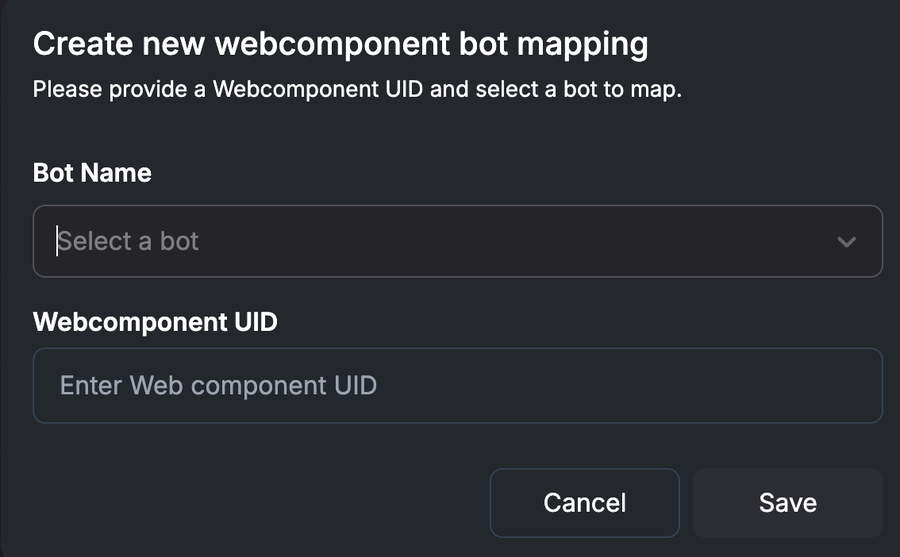
Create a New WebComponent Bot Mapping
Click the "Create new bot mapping" button at the top right.
Enter the Required Information
In the Create new WebComponent bot mapping modal that appears:
Select a bot from the Bot Name dropdown list.
Enter the WebComponent UID.

Save the Mapping
Click the "Save" button to complete the WebComponent ID creation.
Web Component Integration
The component can be integrated anywhere that supports HTML tags. Additionally, we provide a SharePoint Web Part package that allows seamless integration within the Microsoft ecosystem, including SharePoint and Teams.
The parameters obtained from the Blockbrain team (ClientID, OrgID & SecretKey) and your WebComponents UID are all parameters required for the HTML-Tag:
<blockbrain-main
    clientId="clientId"
    secretKey="secretKey"
    orgId="orgId"
    uid="uid"
    userUid="userUid">
</blockbrain-main>
Guideline for Web Component OAuth Integration
This guide provides instructions for integrating the web component in private mode (using OAuth authentication) and public mode (no authentication). Choose the appropriate mode based on your requirements.
Add the Required Script
To use the chat element component in your website, follow these steps:
Provide us the origin of the page you want to integrate
Add the following script tag to your HTML file:
You can choose either to have English Webcomponents:
<script
  type="module"
  src="https://assets.theblockbrain.io/scripts/blocky-chat/blocky-chat.bundle.js"
  async
>
</script>
Or you can choose to have German Webcomponents:
<script
  type="module"
  src="https://assets.theblockbrain.io/scripts/blocky-chat/de/blocky-chat.bundle.js"
  async
>
</script>
Add the
<blockbrain-main>tag where you want to include the chat component:
<blockbrain-main
    clientId="clientId"
    secretKey="secretKey"
    orgId="orgId"
    uid="uid"
    userUid="userUid">
</blockbrain-main>
Replace
clientIdandsecretKeywith your actual client ID and secret key, theuidwith the accountNo / machineUID anduserUidwith a unique User ID, if you have one that you can send - otherwise just remove it.
Public vs. Private Mode
Private Mode: Requires user authentication. Users must have a Blockbrain account to access the web component, and any data will be persisted based on their account.
Public Mode: No authentication needed. Anyone can use the component, and users are differentiated by the
userIdfield. This mode requires you to supply aclientIdandsecret.
Private Mode Integration (Authenticated Usage)
For secure and authenticated usage, configure the web component in private mode using the issuer attribute.
Attributes Required:
issuer
URL of your Blockbrain domain (Knowledge Bots Frontend)
Provided by Client Side
Required
uid
A unique identifier for the bot instance or application
Assigned by Client
Required
userUid
A unique identifier for the user, to personalize or track usage per user
Provided by Client Side
Optional
orgId
Organization ID
Provided by Blockbrain
Required
Example:
<blockbrain-main
  orgId="your-org-id"
  issuer="https://into.dev.theblockbrain.io"
  uid="blockbrain-bot-2"
  userUid="random-id-8"
</blockbrain-main>
Public Mode Integration (Non-Authenticated Usage)
For scenarios where authentication is not required, configure the web component in public mode using the clientSecret attribute.
Attributes Required:
orgId
Organization ID
Provided by Blockbrain
Required
clientId/secret
A clientId and secret to enable public mode
Provided by Blockbrain
Required
uid
Unique identifier for the bot instance or application
Assigned by Client
Required
userUid
Unique identifier for the user
Assigned by Client
Optional
Example:
<blockbrain-main
  orgId="your-org-id"
  clientId="your-client-id"
  secretKey="your-secret"
  uid="your-uid"
  userUid="optional-user-id">
</blockbrain-main>
Notes
Private Mode: Recommended for environments requiring user authentication. Ensure the
issueris correctly configured.Public Mode: Use only in scenarios where authentication is unnecessary or when access control is not a concern.
Security: Avoid exposing sensitive data in the frontend. Use public mode cautiously.
This completes the setup for your chosen integration mode.
Customization
Extend the <blockbrain-main> tag and make it your own by adding several attributes:
<blockbrain-main
    clientId="your-clientId"
    secretKey="your-secretKey"
    orgId="your-orgId"
    issuer="my-issuer-url"
    layout="minimal"
    iconUrl="https://example.com/default-icon.png"
    iconSize="50px"
    messages='{
        "notCreated": {
            "iconSize": "100px",
            "title": "Bot Setup Completed",
            "description": "The bot setup is completed. Redirecting you to your bot..."
        },
        "completed": {
            "iconSize": "106px",
            "title": "Custom Completed Title",
            "description": "Custom completed description."
        },
        "requested": {
            "iconSize": "56px",
            "title": "Custom Requested Title",
            "description": "Custom requested description."
        },
        "needAttention": {
            "title": "Custom Attention Needed",
            "description": "Custom need attention description."
        },
        "rejected": {
            "title": "Custom Rejected Title",
            "description": "Custom rejected description."
        },
        "loading": {
            "iconUrl": "https://cdn-1.webcatalog.io/catalog/blockbrain/blockbrain-icon-filled-256.webp?v=1714777605928",
            "iconSize": "106px",
            "title": "Custom Loading Title",
            "description": "Custom loading description."
        },
        "error": {
            "title": "Custom Error Title",
            "description": "Custom error description."
        },
        "missingParams": {
            "title": "Configuration Error",
            "description": "It looks like something is missing from your setup. Please check your configuration and try again."
        }
    }'>
</blockbrain-main>
Attribute Descriptions
iconUrl(optional)Description: URL to a default icon image used for all messages if a specific
iconUrlfor the message is not provided.Customization: Use the
iconUrlproperty inside a specific status message to override this default.Hide the Icon: To hide the icon for a message, set its
iconUrlto an empty string ("").Example:
"https://example.com/default-icon.png"
iconSize(optional)Description: Specifies the size of the default icon.
Customization: You can override the size for a specific status message by specifying its iconSize.
Values: Accepts any valid CSS size (e.g., 50px, 4rem, 100%).
messages(optional)Description: A JSON string that allows you to customize the titles and descriptions for various statuses.
Structure: The
messagesattribute is a JSON string that allows you to customize the appearance of each status. Each status has the following customizable properties:iconUrl(optional): URL to an icon specific to this status. Use an empty string ("") to hide it.iconSize(optional): Overrides the defaulticonSizefor this status.title(optional): Heading text for the status. Use an empty string ("") to hide it.description(optional): Text displayed below the title. Use an empty string ("") to hide it.
Status Keys:
notCreated: Displayed when no bot is found for the providedbotUid. The user may need to request the bot.completed: Displayed when the bot setup is complete, with an optional redirection notice.requested: The bot request is submitted, and the bot will be ready in a few seconds. The user may need to refresh the page to display the botneedAttention: Requires admin or user action to proceed with the bot setup.rejected: Displayed when the bot request is rejected.loading: Shown during initialization or other loading operations.error: Indicates a failure during the bot setup process.login: Shown on login page
Web Part: Deployment & Configuration Guide
Use this guide to deploy, configure, and troubleshoot your Blockbrain Chat SPFx Web Part in SharePoint Online.
1. Deploy the Package to SharePoint
Access the App Catalog
Navigate to your SharePoint Online App Catalog site. Usually the URL is something like:
https://<your-tenant>.sharepoint.com/sites/appsUpload the Package
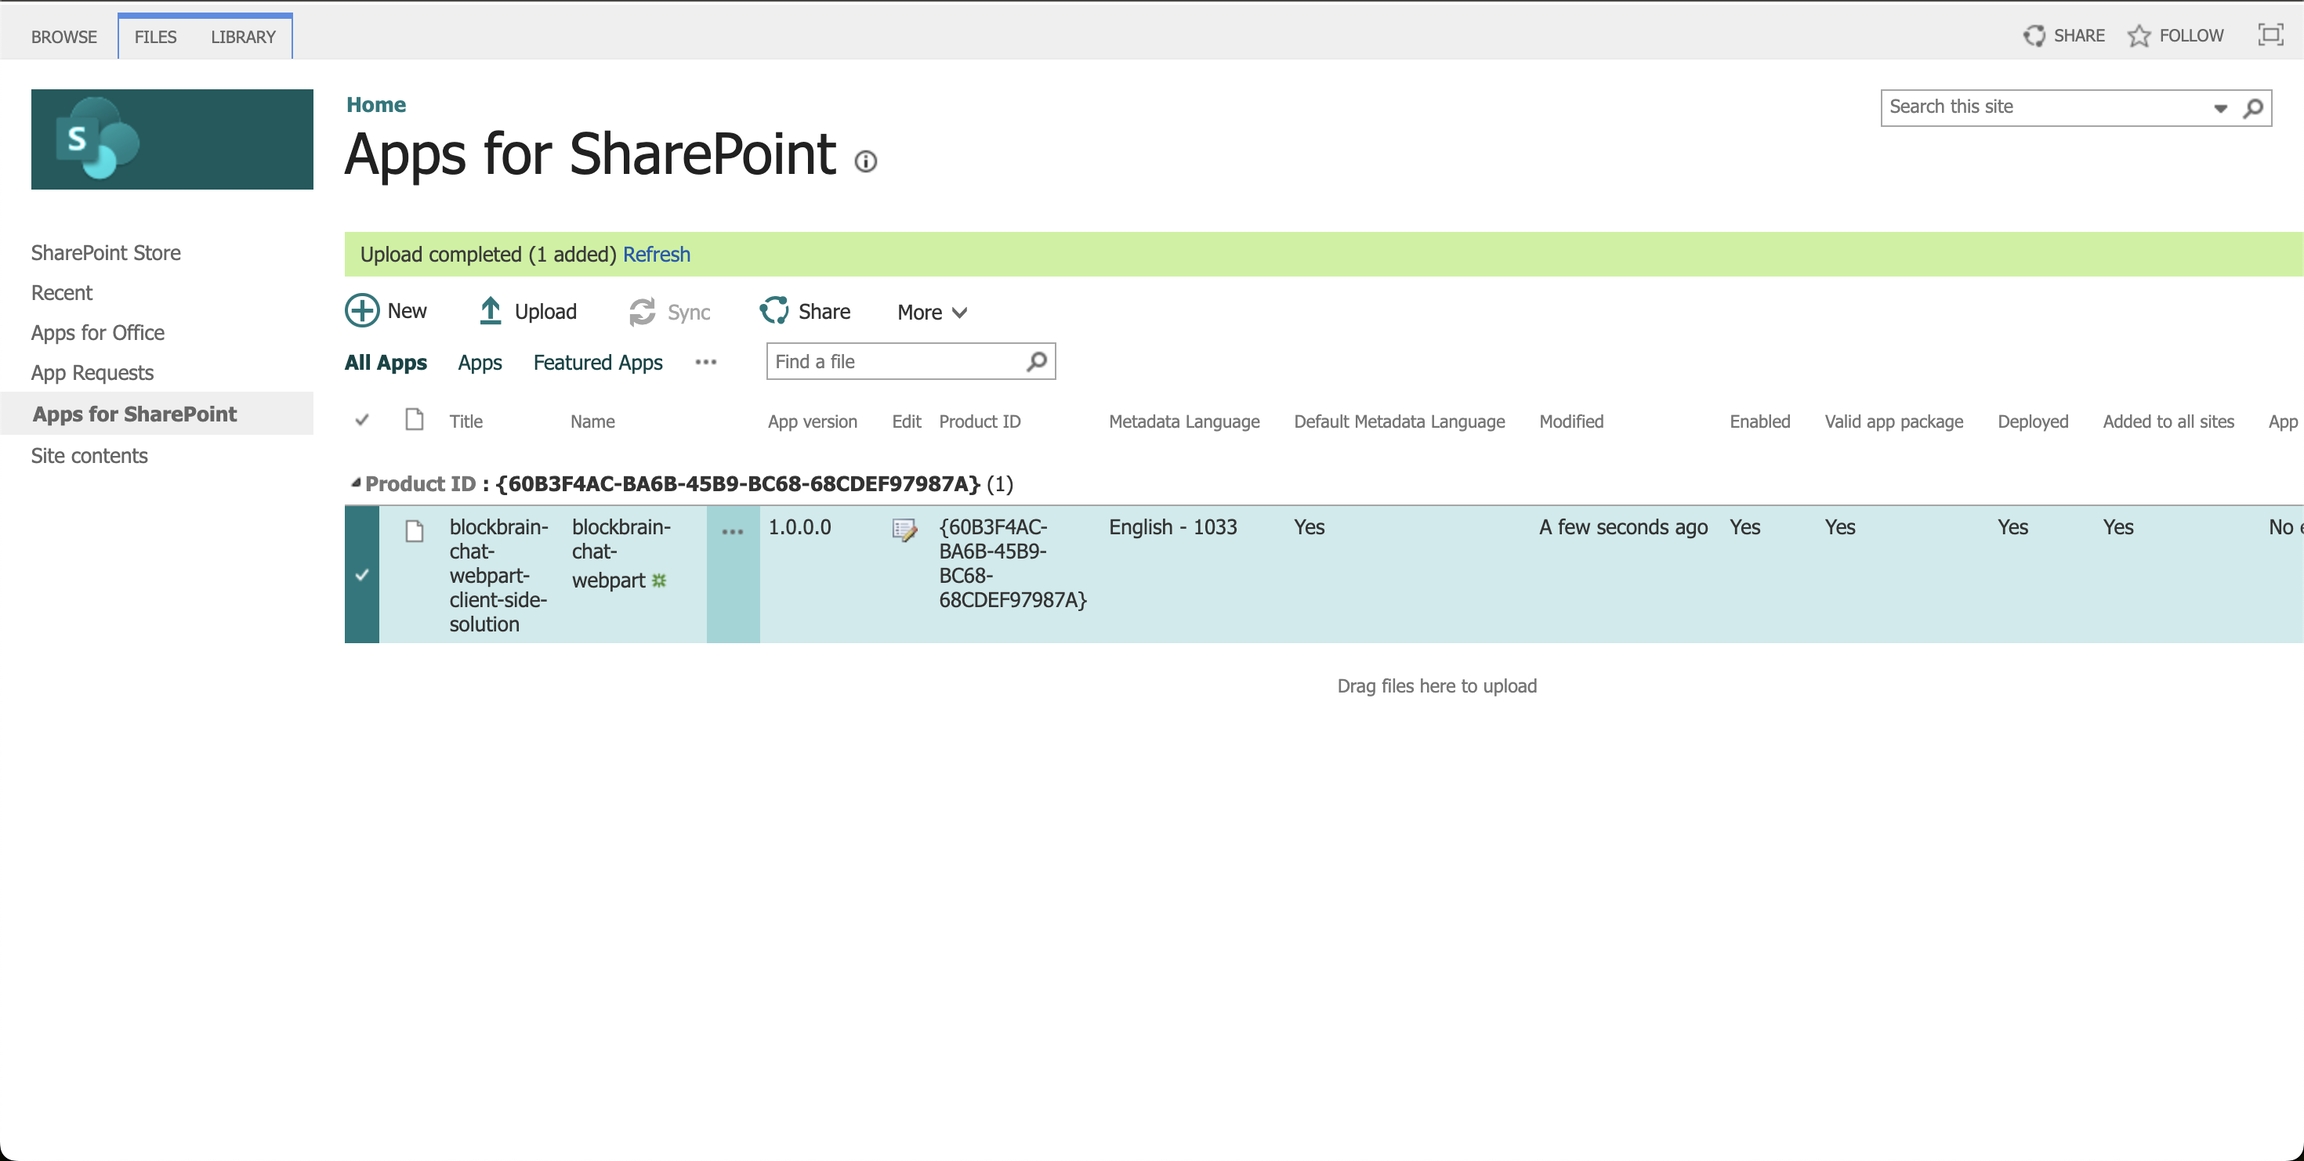
Go to Apps for SharePoint (in the left navigation).
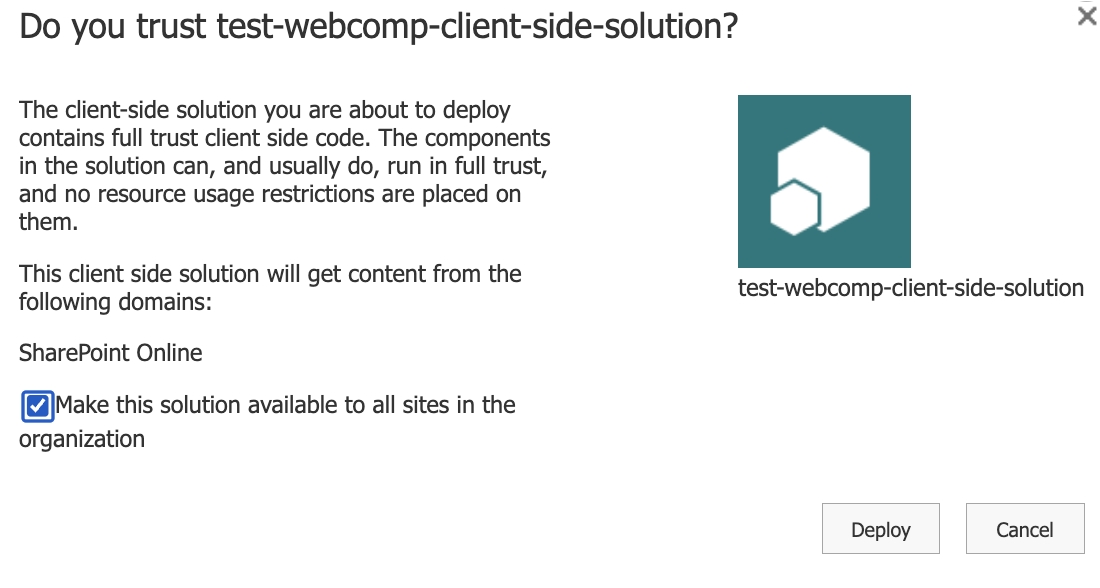
Click Upload and select the
.sppkgfile from thesharepoint/solutionfolder of your project.When prompted, check Make this solution available to all sites in the organization if you want it globally available.

Click Deploy.

Verify Deployment
If you selected Make this solution available to all sites, the web part should automatically be available on all site collections.
Otherwise, you may need to explicitly add the app to the site where you want to use it.
2. Add the Web Part to a SharePoint Page
Navigate to Your SharePoint Site
Go to the site where you want to add the chatbot.
Edit the Page
Click on the gear icon and select Edit Page or Edit.
Add the Web Part
Click on the + icon to add a new web part.
Search for
BlockbrainChat(or the name you provided during setup).Add it to the page.

3. Web Part Configuration
The new web part has three primary configuration sections in its Property Pane: Authentication, Content, and Appearance.
Open the Web Part Property Pane
While the page is in Edit mode, select the Blockbrain Chat web part.
Click the pencil icon to open the web part’s property pane.
Authentication
Login Mode (
loginMode)Private Login: Uses an issuer URL (auth endpoint).
Public Login: Uses clientId and secretKey for public authentication.
Issuer (Private Login only) (
issuer)Provide the issuer endpoint URL if you have set
loginModeto"private".
Client ID / Secret Key (Public Login only) (
clientId,secretKey)Provide the OAuth2 credentials to authenticate with Blockbrain if you have set
loginModeto"public".
Content
Bot Unique Identifier (
uid)Enter the bot UID if you want to specify a particular bot.
This can also be overridden by URL parameters (e.g.,
?uid=your-bot-id).
Appearance
Width & Height (
width,height)Accepts any valid CSS size value: e.g.,
100%,600px,50vh, etc.Use
%or viewport units for responsive design, orpxfor a fixed size.
Icon URL (
iconUrl)Provide a direct URL to the icon you want displayed in the chat.
Icon Size (
iconSize)Set the size of the icon (e.g.,
50px,96px).
Custom Messages JSON (
messages)Allows you to override or customize system messages. Must be valid JSON.
Background Color (
backgroundColor)Pick a color from the color picker or input a hex code (e.g.,
#FFFFFF).
Web Part Title
By default, the web part will show a title area. You can edit it directly on the page:
Click on the web part title text.
Enter your custom title (e.g., “Customer Support Chat”).
Press Enter or click outside to save.
Saving and Publishing
After you finish configuring the properties, click Apply (if needed), then Publish the page.
4. Additional Configuration Options
URL Parameters
You can override the bot UID by appending
?uid=YOUR_BOT_UIDto the page URL.Similarly, you can specify a userUid with
?userUid=SOME_VALUEto track or identify the user differently.
For Detailed Prop Documentation
Refer to the official Blockbrain Docs for additional, up-to-date property references and usage examples.
5. Troubleshooting & Common Issues
Script Loading Issues
Correct External Script URL: Ensure you haven’t altered the
blocky-chat.bundle.jsURL.Network / Proxy Restrictions: If your company network blocks external scripts, ensure
https://assets.theblockbrain.io/is allowed.
Authentication Errors
Double-check loginMode, issuer, clientId, and secretKey in the property pane.
If using private login, ensure the issuer endpoint is correct.
If using public login, ensure both client ID and secret key are valid.
Bot Not Found
Verify the uid you provided (either in the web part property or URL) is a valid bot UID from your Blockbrain environment.
Web Part Not Appearing or ‘Not Found’
Ensure you uploaded the
.sppkgfile to the App Catalog.Check Make this solution available to all sites if you want it to appear in site collections.
If not, add the solution to your specific site’s Site Contents.
Other Users Cannot View the Web Part
Confirm that the web part (and the underlying script) is shared or accessible by all intended users.
If the script is externally hosted, verify that the script domain is not restricted by tenant policies.
Last updated


